Installation can be the scariest step in the process of switching to digital menu boards. Depending on your method of installation, there’s a trade-off between time, stress, and cost. Before choosing a method, determine whether your time or money is more valuable to make the decision easier. The three main paths you can take to install a menu are:
- Do-It-Yourself Digital Menu Install
- Hire a Technician
- Installation Through Third Party Company
Do-It-Yourself Digital Menu Install
For DIY digital menu board installation, follow these steps:
- Determine screen location
- Find a compatible mount (VESA and max weight)
- Mount your screen
Recommended materials:
- 6 ft. tall ladder
- Stud finder
- Measuring tape
- Screwdrivers (standard/phillips)
- Drill
- Blue concrete 2″ bolts
- Toggle bolts
1.) Determine Screen Location
Find an area for your digital menu boards that is:
- High visibility
- Sturdy Mounting surface
- Within 6 ft. of a power source
If the installation area isn’t near a power outlet, you’ll need to use an extension cord or have an electrician to route power to the screen location. No electrical work should ever be performed in your business without a licensed electrician. You should do any necessary electrical work before installing the screens.
IMPORTANT: Fire codes for extension cords vary by state and county. Extension cords are generally for temporary use only and should not be a permanent solution for running power to your displays. Power cords should be plugged directly into a wall power source with a surge protector. Check your local fire code regulations for more information.
Walls and ceilings both work for hanging a display. The main factor is sturdiness of the surface. Choose based on which location you can get the safest mount possible. If both your ceiling and wall are suitable, decide which will be easier to drill into. For example, it would be much easier to drill into a wooden stud rather than concrete.
2.) Find a Compatible Mount (VESA and Weight)
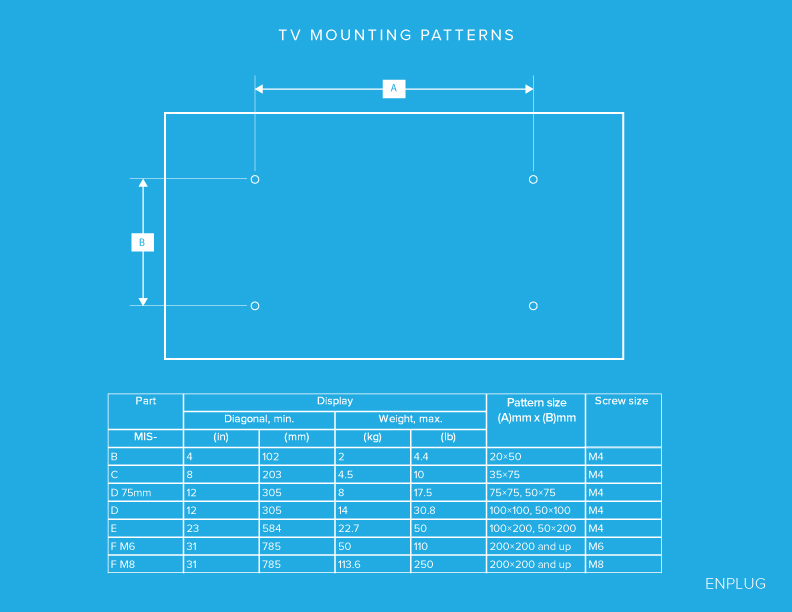
Next, determine your screen’s mount hole patterns, so you can purchase a compatible mount. Most modern flat panel TVs follow standards for mounting called VESA. First, measure the distance between the four holes that make a square on the back of your screen. Based off these measurements, pick your mount and screw size.
TIP: most screens less than 42” in diagonal screen size have the VESA pattern of 200 x 200 mm. Most screens bigger than 42” use 400×400 mm. Use the chart below to help guide you.
Source the proper screws for your mounting surface. Mounting brackets usually come with screws that work for wooden studs, however if you’re drilling into drywall or concrete for example, you’ll need different screws. Your local hardware store should be able to help you find the exact bolts you need.
3.) Mount Your Screen
Mounting a single screen takes 1-2 hours. All electrical work should be completed before the screen installation. Make sure to schedule the installation during a time your business is closed. You’ll need two people to mount screens larger than 46”, and having two people makes mounting smaller screens significantly easier and safer. Stay hydrated!
Additional Considerations:
DIY can save you some money, but it’s a large investment of labor and materials. The money you save by doing it yourself may be less valuable than the time it takes away from managing your business.
Director of Operations at Enplug, Martin, explains:
“Installing digital menus is no easy feat; you need to keep safety at top of mind. Seriously, don’t take this lightly. Take it one step at a time, don’t cut corners, and consult or hire a professional.”
Keep insurance and safety of your customers in mind as well. For DIY, you are 100% liable for injuries caused by a non-sturdy screen. Be aware of the fire hazards that come along with installing a TV.
Hire a Technician
You can also contract the installation job to a technician. Finding a qualified contractor can be difficult. For installations, Enplug works closely with Field Nation, an easy-to-use website that connects qualified contractors with businesses. Contractors must pass Field Nation screenings to verify that they’re qualified service professionals. Each contractor has a profile that lists his or her skills and credentials. Make sure your job requirements match up with the contractors skills and specialties.
TIP: If you are impressed with the job, save your contractor’s contact information for future work (i.e. more screens) so you don’t waste time searching for one later.
Payment is completed through Field Nation and not directly with the contractors (PayPal, check, or debit/credit card).
Another major benefit of hiring a Field Nation contractor is the contractor provides a certificate of liability for your screen, meaning the contractor takes full responsibility for any injury or damage caused by a mistake with the installation.
IMPORTANT: Do not approve a project request unless the technician can prove to the buyer that they carry a minimum of $1,000,000.00 of general liability insurance.
Installation Through Third Party Company
The easiest and most time-efficient option is to have a dedicated digital menu company install your screens. You don’t have to worry about which mount to get, how to hang it, any liabilities, or coordinating with a contractor.
Final Note: Safety
Safety should be the biggest concern while choosing an installation method. Although you can save money with DIY, for the inexperienced, we recommend using a trained professional to mount your display. Take advantage of providers who offer free installation for the least stressful experience.
Enplug Tip
It’s always recommended to source your installation to a trained professional. This will help factor in all considerations and eliminate any risks associated with installation.
Ready to get started? Request a demo to learn more about Enplug’s beautiful and simple digital menu solution for restaurants.