Enplug API Connector helps automate digital signage content
At Enplug, we believe businesses should be able to display whatever content they want, whenever they want, without a lot of work. That’s why our Engineering Team has updated our Enplug Templates App with the power to display data from APIs. This no-code feature opens up a whole new world of automated content options for Enplug users!
Now anyone in your company can quickly create a digital signage template to display custom data from in-house or third-party software applications. That means you no longer have to manually create or edit slides to show data that is frequently updated. Since it’s a no-code solution there’s no need to hire developers to get it up and running. The best part is, unlike many solutions on the market, Enplug API Connector is free to all Enplug customers.

Advantages of displaying data through the API Connector
Last year we introduced content triggers to the Templates App so our users could automatically share employee birthdays or display holiday graphics from a data table without the need to make manual changes. Our API Connector expands this automation even further by allowing you to connect to more data sources.
With our new feature you can display data from your own company’s API or from places like Shopify, UPS, and Eventbrite. You can use the APIs of these popular platforms to display information like the latest transactions from your Shopify store, the tracking status of a package, or events happening in your area.
The Enplug API integration brings about a new level of customization and automation rarely seen in digital signage products. You can use the API Connector to automatically share internal communications updates as they happen, show the latest sales numbers, and instantly recognize employee successes, Take a look at this list of publicly available APIs to get an idea of what types of content you can automate that will help you achieve your communication goals.
How can I use the Enplug API Connector to automate my digital signage?
Enplug has integrations with many popular services such as Slack, Youtube, and Zoom, but we want you to be able to integrate even more of the tools your business uses. Here are just a few ways you can use our API Connector:
- Have commuters in the office? Add a transportation board to your digital signage. Tap into bus, train, airport, and ride-sharing APIs to create transit boards.
- Tired of repeating the WiFi password to trusted guests? Use a QR code generator API to let users easily log into a guest network. Change a few lines in the API call instead of generating and uploading a new graphic anytime the WiFi credentials change.
- Want to show customers or warehouse and stock room employees what’s currently available? Tie the Template API into your inventory or point of sale API.
- Display some fun things like a random joke or some cat facts to keep things fun. Great for both digital signage and Enplug’s ScreenSaver!.
- Keep your support staff motivated with feedback from customers using the Zendesk API. We use this in our own office, you can see an example screen of what we use.

Tutorial: Using API Data in Enplug Templates
If you’re interested in fast and flexible digital signage content, this article will show you how easy it is to implement your own Template API connection. Below is a live digital signage feed with a mix of ticker prices (Finnhub API) and jokes (Jokes API).
To give you an idea of how to implement the Template API on your Enplug screens, we’ll recreate a stock ticker. You can use the Enplug Market Tracker App to display current stock prices, but in this case I personally chose the Finnhub API which enables me to grab data on the opening price and close price of a particular ticker and display it as I’m working
Overall, we’ll need to follow a few basic steps in this tutorial:
- Sign up with Finnhub to get the API key
- Use the API documentation to find the data attributes we want to include in our template
- Create a template in Enplug Templates App and launch the Web Data Connector wizard
- Add fields to the template that will automatically update when the API pulls data
- Format our template to make it look great!
1. Sign up for the API
To get started, we’ll need the API key that gives us access to Finnhub’s data. Once you register and log in, you can copy your API key from the dashboard.
Let’s take a look at the documentation on how to get a ticker price.
You’ll see a url in the sample code.
https://finnhub.io/api/v1/quote?symbol=NVDA&token=APIKEYEverything before the question mark is the web location of the Finnhub program. Everything after the question mark is called a query string. Each query parameter is separated by the ‘&’ (ampersand) symbol. Each query parameter can be further broken down by the “Name” and “Value” which is separated by an ‘=’ sign. In this case, the query string includes a ticker symbol and your API key. Note that your API key will be different from ours.
2. Identify the data attributes to include in our template
If you enter this url into your browser (be sure you replace “APIKEY” with the actual API key you see in your Finnhub dashboard), you’ll see it returns some JSON data:
{"c":364.11,"h":370.47,"l":363.65,"o":367.85,"pc":364.11,"t":1593758847}You can format it to make it more readable using a site like JSONlint or API tools like Postman, Insomnia, or Paw.
{
	"c": 364.11,
	"h": 370.47,
	"l": 363.65,
	"o": 367.85,
	"pc": 364.11,
	"t": 1593758847
}
With this more readable version, we can match up the response attributes that are mentioned in the documentation. We want to use the value associated with “c” which indicates the current price, “o” for the opening price of the day, and “pc” for the price the stock previously closed at.
3. Create a template in Enplug Templates App and launch the Web Data Connector wizard
Now let’s create a template where we can display that JSON data.
Head over to the Templates App. For this example, start with a blank template. Click the data tab, then select “connect data”, and then choose “Web Data Connector”
Leave the connection option set to the default “Pull connection”. We will cover push connections in a future tutorial.
Deciding whether to choose a pull or a push connection depends on the API you are accessing. Most third-party APIs are pull APIs meaning that you have to poll the API periodically to get new data. In the case of our digital signage template will retrieve data from the API at an interval you set, whether it is every 1 minute, 5 minutes, 10 minutes, or 30 minutes.
If the API you are accessing provides you with a “webhook”, chances are it is a push API. A push API needs an active server that listens for updates that the API sends out.
In our examples here, we are using a pull API. Every time we hit the API’s url, we get new data. You can try this yourself by pasting the URL in your web browser and hitting the refresh button. You’ll see some JSON returned in the browser and it is a bit different each time.
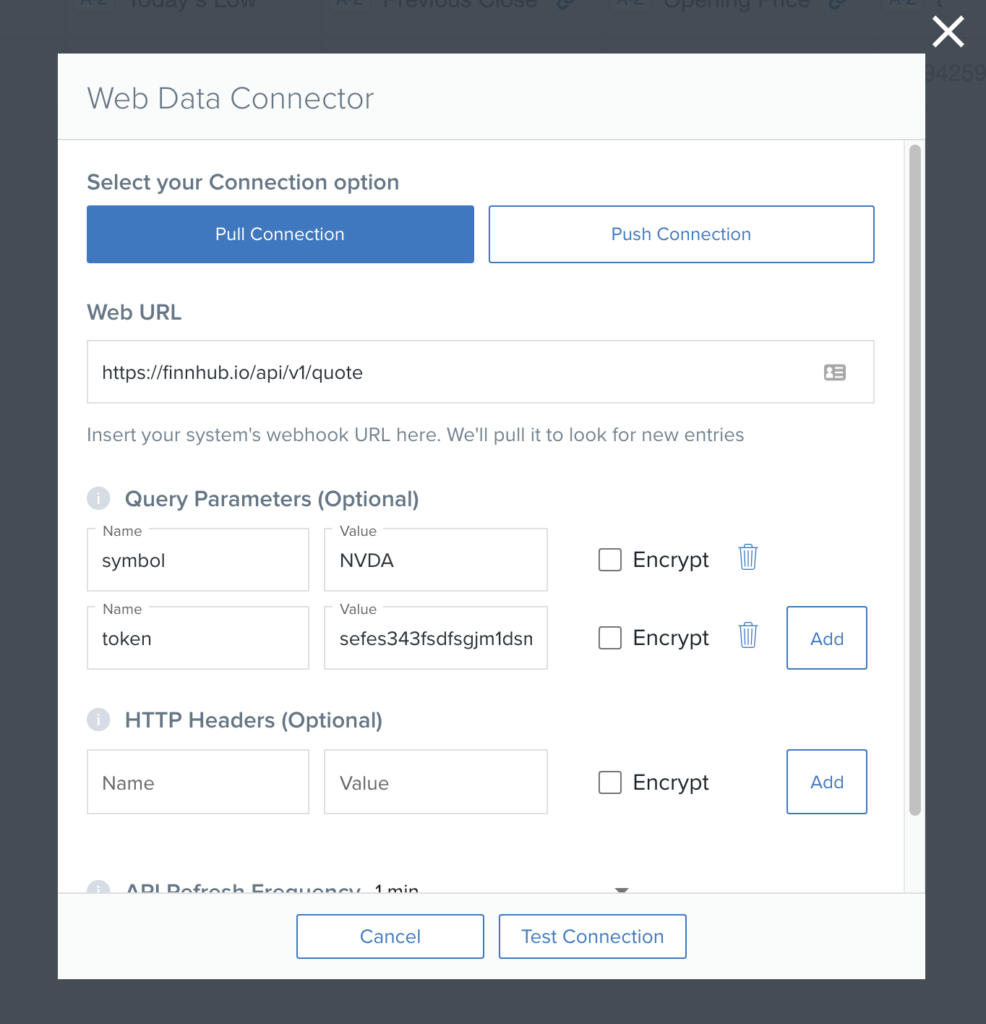
Refer back to the URL we identified in the sample code in Step 2. First, paste everything that comes before the question mark into the “Web URL field”.
https://finnhub.io/api/v1/quote?symbol=NVDA&token=APIKEYPaste this into the “Web URL field”:
https://finnhub.io/api/v1/quoteNext, find the query parameters that are after the question mark and enter them in the wizard:
symbol=NVDA&token=APIKEYThe ‘&’ separates the two queries. Query parameter 1:
symbol=NVDAAdd the second query parameter to the Web Data Connector wizard:
token=APIKEYBe sure to replace your API key with the one in your Finnhub dashboard.
Scroll down a bit and you can adjust the frequency the your template will pull from the API. I set it to 1 minute for this example.

When you are done, it should look something like the above.
Now that we’ve got everything entered. Click test connection. If everything is correct, you’ll be able to move to the next step.
4. Add fields to the template that will automatically update when the API pulls data
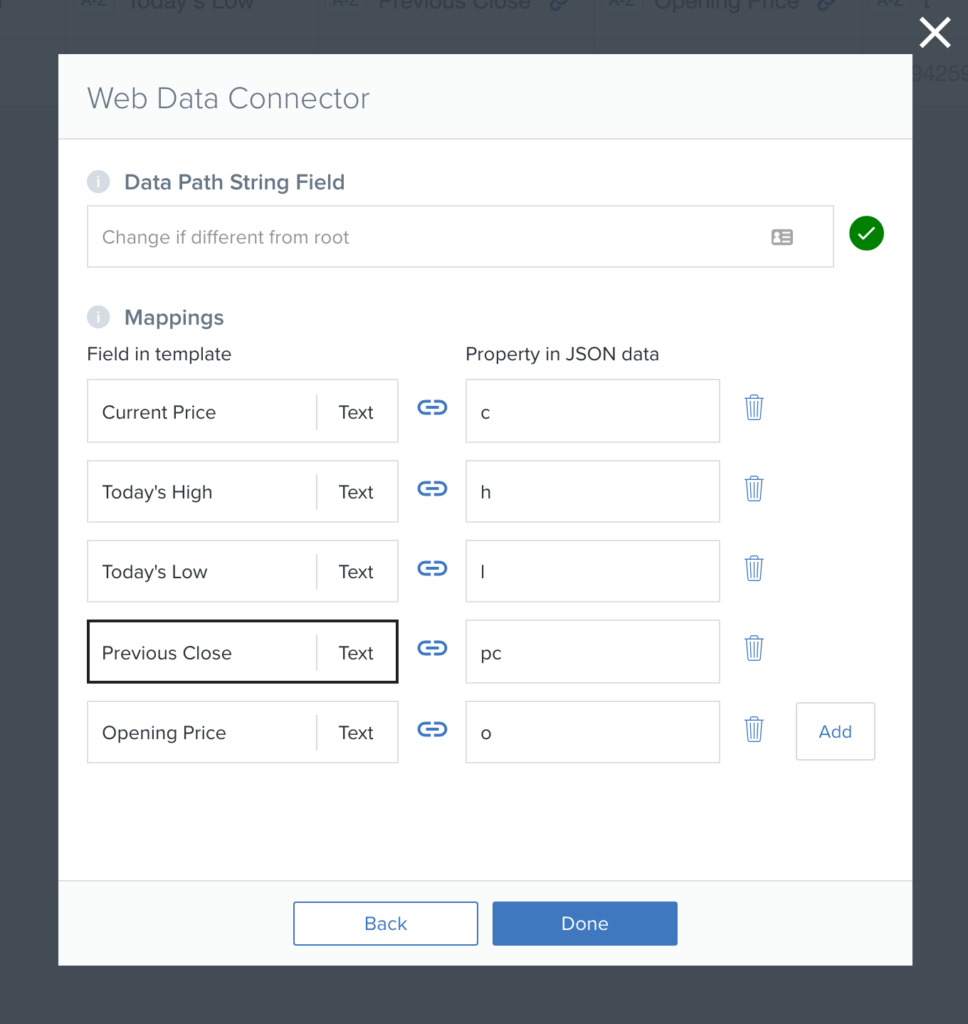
In the next step, we can choose which data we want to include in our sign by using the JSON data from Step 2. For example, let’s add the current ticker price. Under the “Field in template” column insert an easy to remember name for your field like “Current Price.” Since the Finnhub documentation identifies the letter c as the key for the current ticker price, insert c under the Property column.

Once you’ve added all your fields and exited the wizard, save and refresh the template. In the data tab you will now see that the table API data populates the table.

Click on the link icon next to each column header and select “Add to Canvas”. This adds your API data to your template!
Now your template will retrieve and display new data every minute. For more details on setting up the data connection, check out our support article.
5. Format our template to make it look great!
Our final step is to customize the design with a beautiful background, and any additional text relevant to the sign. We can also choose the font and color for our data. To see everything you can do to customize your sign, see our Templates App support article.
And there we have it, a stock ticker that automatically updates with data from an API.
With so many exciting ways to use our API, we’d love to know how you’re using it. Send us your examples and we’ll showcase them on the blog!